Data Transfer and Backup on Remote Computers
This section covers the use of tools like scp, Rsync, sftp and Globus to make transfers and backups. While the examples place an emphasis on Compute Canada, they can be generalised to apply to any remote computer.
rsync-time-backup
rsync-time-backup is a utility available here that builds on top of Rsync.
It allows backups over SSH, backup resumes, uses hardlinks to avoid duplication and provides functionality to create full backups. In short, it can be used to create full snapshots, the frequency of which can be configured e.g. keep each hour of the last 24 hours, each day of the previous month and each month in the previous year.
You may find it useful to combine several techinques in the examples below and in the docmentation of this script.
Example: Backing up to Compute Canada Project Space
The project space is a great place for:
- Frequent backups
- Internal and external sharing
You may want to tarball collections of small files (multiple files < 100 MB) to keep the file count down and to keep the diretory uncluttered.
Note
This works if you set up the SSH key on the Compute Canada server
In this example, we are backing up a drive mounted to our system. In this instance, it is a NAS drive, althogh it could be a hard drive or any other external media.
$ rsync_tmbackup.sh /media/user/data cedar:/home/user/projects/def-pi/data/
You can replace cedar with graham or beluga as required
Example: Backing up to Remote Computer
Suppose you have an ssh machine computer.domain.com
$ rsync_tmbackup.sh /media/user/data user@computer.domain.com:/data/
Example: Backing up using an exclusion list
Suppose you do not want to backup certain directories, files or file types. You must create an exclusion list exclude-file.txt, for instance:
secrets.txt
folder1/*
folder2
folder3/scratch/
*.mat*
This will exclude the file secrets.txt, copy the folder folder1 but not its contents, will not copy the folder folder2 or its contents, will not copy the subdirectory folder3/scratch/ or its contents, and will exclude all files with the .mat extension.
Local machine to external drive
$ rsync_tmbackup.sh /home/user /media/user/data/ excluded_patterns.txt
Compute Canada
$ rsync_tmbackup.sh /media/user/data cedar:/home/user/projects/def-pi/data/ excluded_patterns.txt
Example: Change the Expiration Strategy
From the README:
The default strategy is ``1:1 30:7 365:30``, which means:

* After 1 day, keep one backup every 1 day (1:1).
* After 30 days, keep one backup every 7 days (30:7).
* After 365 days, keep one backup every 30 days (365:30).
To change the strategy to: After 30 Days, keep one backup every 14 days,
STFP
From the Compute Canada Documentation:
SFTP (Secure File Transfer Protocol) uses the SSH protocol to transfer files between machines which encrypts data being transferred.
Unlike SCP, SFTP omes with an interactive prompt.
Dropping into the SFTP Prompt
$ sftp user@remote_hostname_or_ip_address
For instance,
$ sftp john@cedar.arc.ubc.ca
If you set up your SSH key on the remote computer, you won’t even need a password.
$ sftp cedar
If it worked, you should be in the prompt e.g.
$ sftp cedar
Connected to cedar.
sftp>
Exiting the SFTP Prompt
sftp> exit

or

sftp> bye
Help
sftp> help

or

sftp> ?
Transferring File to Remote
sftp> put <local file or directory> <new name on remote [OPTIONAL]>
e.g.
sftp> put data.hdf5
Uploading data.hdf5 to /project/6006382/user/data.hdf5
data.hdf5                                    100%   11GB  100.3MB/s   01:50
sftp> put data.hdf5 data_20181012.hdf5
Uploading data.hdf5 to /project/6006382/user/data_20181012.hdf5
data.hdf5                                    100%   11GB  100.3MB/s   01:50
Transferring File from Remote
sftp> get <remote file or directory> <new name on local [OPTIONAL]>
e.g.
sftp> get data.hdf5
Fetching /project/6006382/user/data.hdf5 to data.hdf5
/project/6006382/user/data.hdf5              100%   11GB  100.1MB/s   01:50
sftp> get data.hdf5 data_20181012.hdf5
Fetching /project/6006382/user/data.hdf5 to data_20181012.hdf5
/project/6006382/user/data.hdf5              100%   11GB  100.1MB/s   01:50
SCP
From the Compute Canada Documentation:
SCP stands for "Secure Copy". Like SFTP it uses the SSH protocol to encrypt data being transferred. It does not support synchronization like Globus or rsync. Some examples of SCP use are shown here.

SCP supports an option, -r, to recursively transfer a set of directories and files. We recommend against using scp -r to transfer data into /project because the setgid bit is turned off in the created directories, which may lead to Disk quota exceeded or similar errors if files are later created there.
Basic Usage
$ scp <location/file to copy from> <location/file to copy to>
Transferring Files
Suppose a folder in your current local working directory is as follows:
package/
├── package
│   ├── conf.py
│   ├── __init__.py
│   ├── models.py
├── LICENSE
├── README.md
├── setup.py
└── tests
    ├── test_interface
    |   ├── tests.py
    ├── test_models
    ├── run_tests.py
Running this will only copy LICENSE, README.md and setup.py, and nothing in the other folders or subdirectories
$ scp package cedar:/home/user
Running this will copy everything
$ scp -r package cedar:/home/user
Note
The above examples will only work if you set up an ssh key on the remote computer
If using the full address of the remote computer, the equivalent examples are:
$ scp package username@cedar.computecanada.ca:/home/user
$ scp -r package username@cedar.computecanada.ca:/home/user
Transferring between two remote Computers
$ scp graham:/home/user cedar:/home/user
$ scp username@graham.computecanada.ca:/home/user username@cedar.computecanada.ca:/home/user
Globus
Option 1: Globus GUI
Tip
This can be extended to file transfers between personal endpoints and between Compute Canada servers
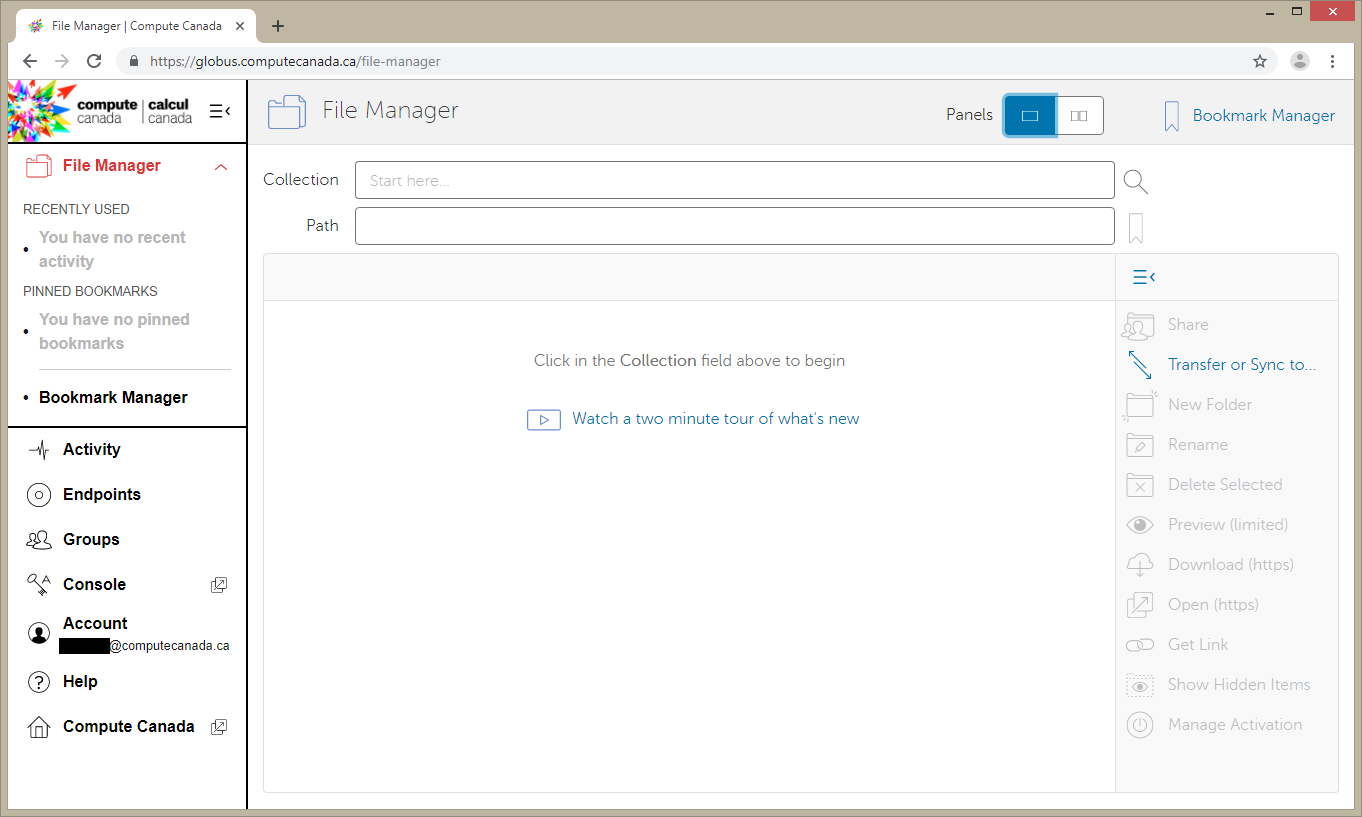
- Click on
Endpoints - Click on
Add an EndpointthenGlobus Connect Personal - Enter a name for your endpoint, e.g.
My_workstationin this case. Check theThis will be a high assurance endpointbox if dealing with highly sensitve data
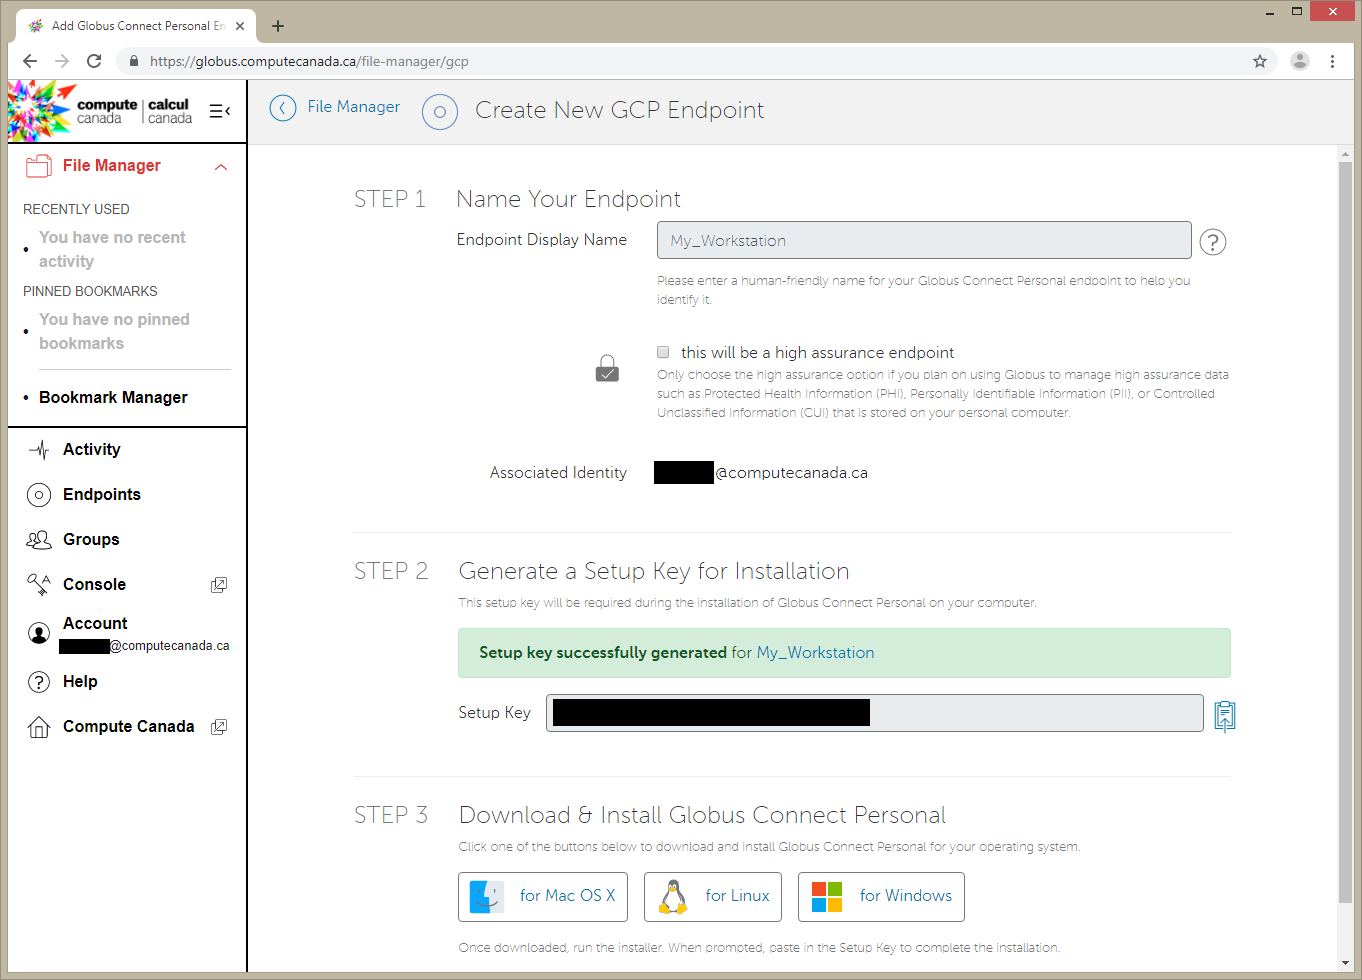
- Generate the Setup Key and copy it to your clipboard.
- Using the links at the bottom of the page, install the Globus Connect Personal Client on your machine and follow the on screen instructions
- Run the client and paste your Setup Key, then click
OK
- Add location(s) of data you want globus to be able to access by clicking on +.
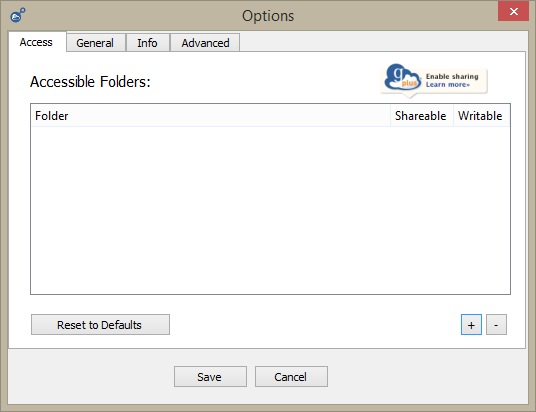
Tip
- Ticking Shareable will allow outbound transfers
- Ticking Writable will allow inbound transfers
- Click
Savewhen done - Go back to your browser and click on the
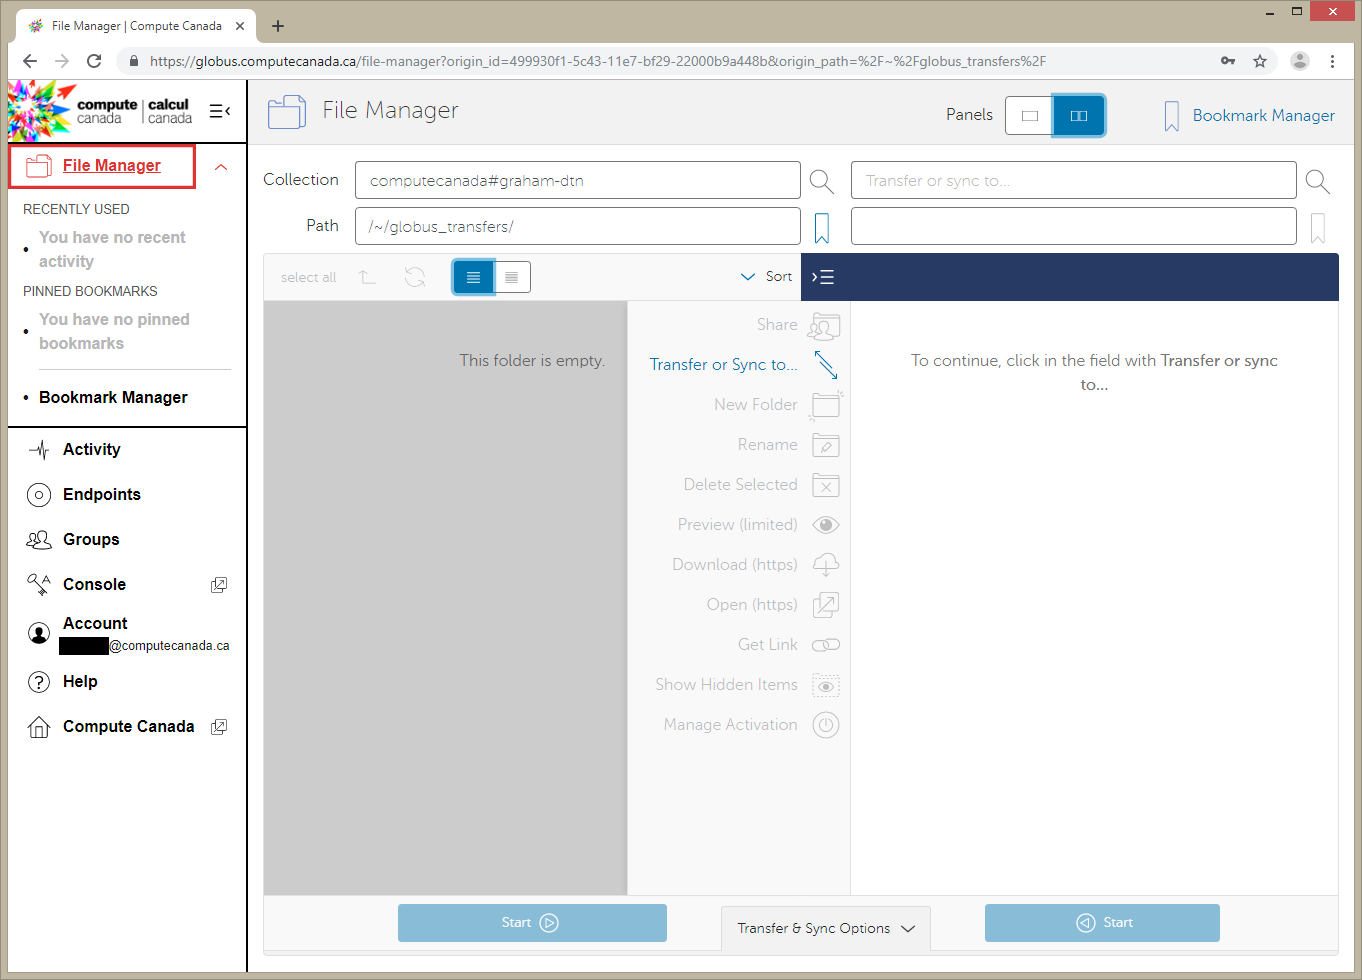
File ManagerTab - Search for the Compute Canada server you want ot upoad the files to. In this example, we are using Graham.
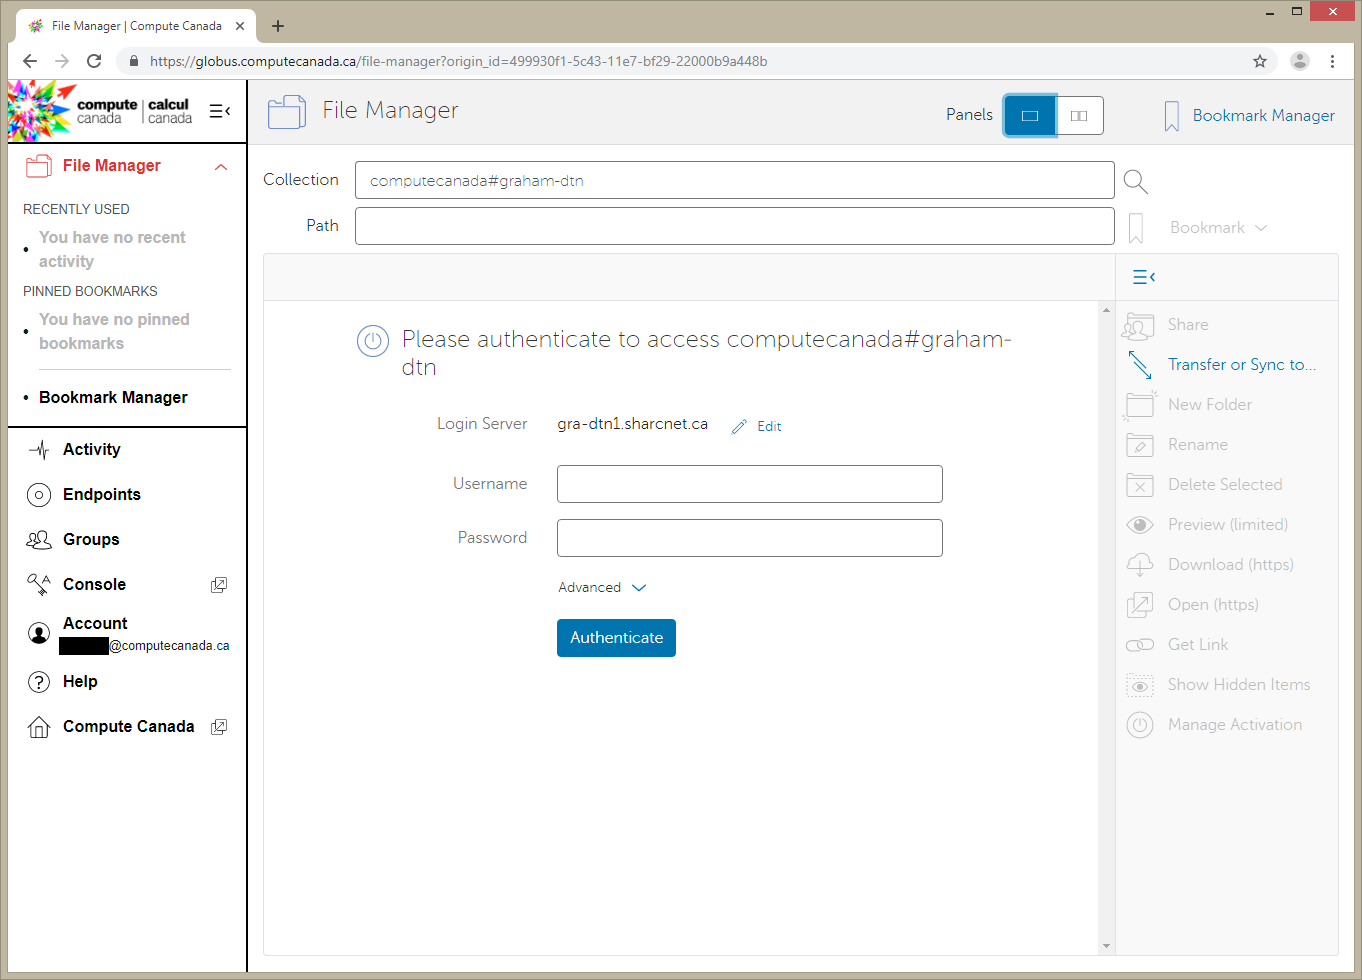
- Log in with you compute canada credentials and click on
Authenticate - Your Home directory should now be displayed. Navigate to the folder you want to keep the data in. In this example I will use the
globus_transfersdirectory in my home directory. - Click on
Transfer or Sync to...on the right side menu
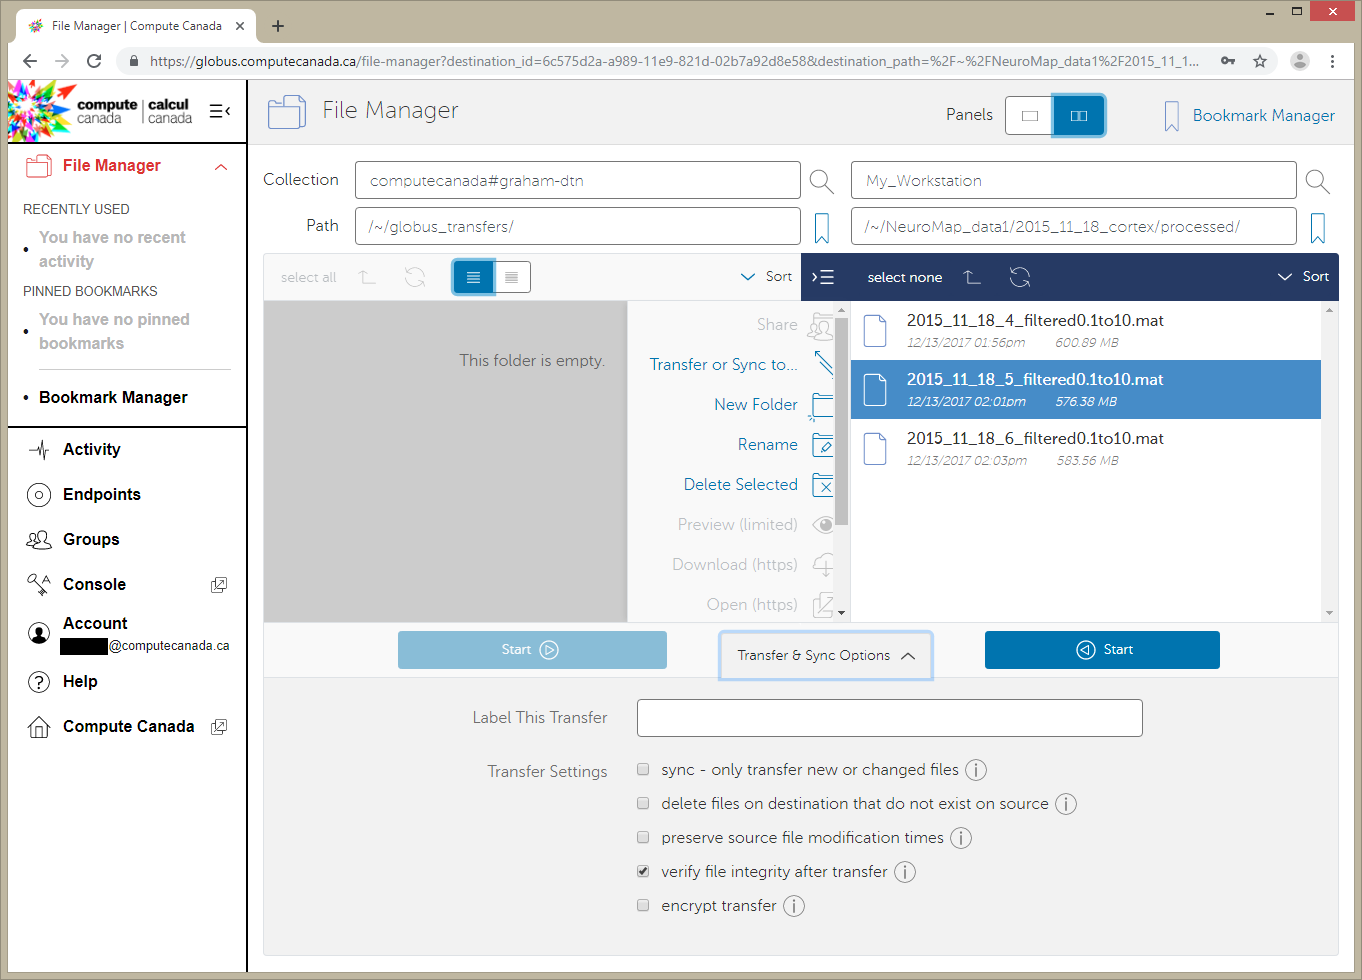
- Click on
Transfer or sync to...box. Click onYour Collectionsthen on your desired endpoint’s name. - Navigate the directory structure on either endpoint and select the folder(s) or file(s) you want to transfer/sync to the other endpoint. Clicking on Transfer and Sync Options below, you can select a multitude of options for managing the content on the destination endpoint. Click on
Startwhen done.
- You should see a message like:
Transfer request submitted successfully. Task id: <TASK_ID>where <TASK_ID> is a system generated hash for your task.
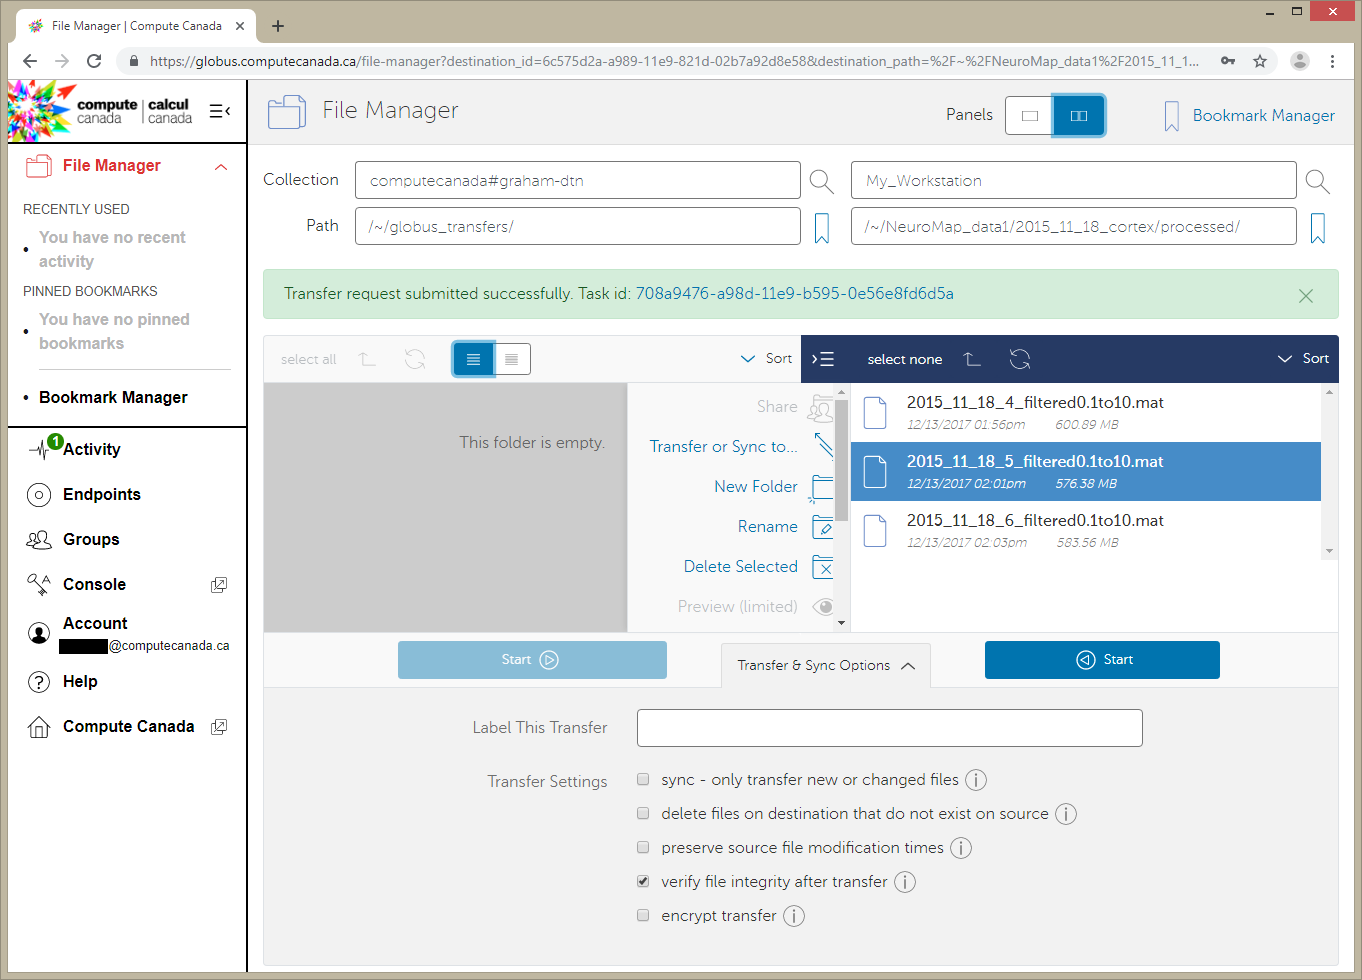
18. The client on our endpoint will handle your transfer and send you an email when it is done. You can view the status of the transfer in the Activity tab 19. Looking at the filesystem on Graham upon completion, we can see that the file is indeed there:
[<user>@gra-login2 globus_transfers]$ ls -lha
total 555M
drwxr-x--- 2 <user> <user>    3 Jul 18 14:54 .
drwx------ 6 <user> <user>   13 Jul 18 14:38 ..
-rw-r--r-- 1 <user> <user> 550M Jul 18 15:02 2015_11_18_5_filtered0.1to10.mat
Git-Annex
Git-Annex uses git to create an annex, which presents files to the user in a single directory structure, even though the individual files are distributed across multiple locations. It can also be confiogured to create a number of copies of a file distributed across different annexes. This enables users to remove a local copy while ensuring redundancies are available on other storage locations. It is also able to synchronise files across redundancies. File versions can be uniquely tracked and referenced using git changeset hashes.
It also comes with a webapp interface.
Note
Git-Annex is a powerful tool but requires knowledge of git, UNIX command line and careful scripting to use effectively.
Use Case Demo: Syncing files with Git-Annex using Linux CLI
The following demo was tested on Ubuntu 18.04 LTS
Note
sudo priviledges are required to install git-annex
Install the Git-Annex from NeuroDebian.
Create a repository in a location of your preference
$ mkdir annex
$ cd annex
$ git init
Initialized empty Git repository in /home/user/annex/.git/
$ git annex init
init ok
Add file to the repository
$ cd /home/user/annex/
$ cp ~/Pictures/121406.jpg ./
$ git annex add .
add 121406.jpg ok
(recording state in git...)
$ git commit -a -m added
[master (root-commit) 1259e1c] added
1 file changed, 1 insertion(+)
create mode 120000 121406.jpg
Add a remote, in this case, an external hard drive called ‘My Passport’
$ cd /media/user/USB\ DISK/
$ git clone /home/user/annex/
Cloning into 'annex'...
done.
$ cd annex
# get the desktop and the hard drive to get to know each other
$ git annex init
$ git remote add desktop /home/user/annex
$ cd /home/user/annex
$ git remote add harddrive1 /media/user/My\ Passport/annex
Now let’s add a bunch of files to the Desktop’s Annex
And now let’s add a bunch of other files to the Hard Drive’s Annex
Looking at the contents of the Desktop annex, we see the following:
$ ls
121406.jpg  121419.jpg  121421.jpg
Looking at the contents of the Hard drive annex, we see the following:
$ ls
121406.jpg  121415.jpg  121420.jpg
Now we need to sync the files and make sure our annexes have the same contents
Now, looking at the contents of the Desktop annex, we see the following:
/home/user/annex$ ls
121406.jpg  121415.jpg  121419.jpg  121420.jpg  121421.jpg
And also when looking at the contents of the Hard drive annex, we see the following:
/media/user/My Passport/annex$ ls
121406.jpg  121415.jpg  121419.jpg  121420.jpg  121421.jpg
This can be automated as a cron job that syncs your files with your backups in regular intervals
Refer to the documentation to learn more about setting up ssh remotes, removing and transferring files and troubleshooting.
Downloading files from data respositories
FRDR
FRDR offers the option to download files using globus. Refer to the Globus GUI section above for instrutions on how to download files using Globus. Globus alkso provides the option of downloading the file(s) using a direct download link.
Direct Downloads
To download files using a direct downlaod link, for instance, via Dataverse, use wget or curl.
Example
To download the `Neurophotonics tutorial on making connectivity diagrams from Channelrhodopsin-2 stimulated data <>`_ dataset from Dataverse, using wget
$ wget https://dataverse.scholarsportal.info/api/access/datafile/77286?gbrecs=true
Alternatively, you can use curl
$ curl https://dataverse.scholarsportal.info/api/access/datafile/77286?gbrecs=true --output download.zip # or whatever you want to call the file you download. Keep in mind the file format.